React "Lifting" Functions
One very important descision every react developer has to make is how to structure the app and which component will be responsible for holding the data.
Because data can cause elements to re-render we should keep data as low down in the tree of elements as possible. This keeps each piece as separate and modular as possible.
There will be many cases in which the data that you use in one component in the tree is needed in a sibling component.

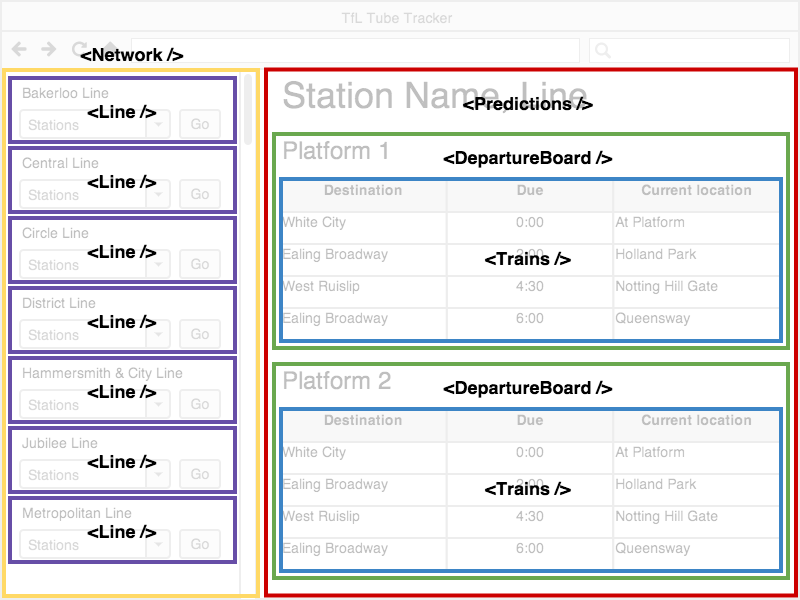
For this example let's take the Line component.
There could be many features that are implemented in this component:
- conditional rendering of the drop down options
- rendering the drop down options from an ajax call to get train line conditions
- etc., etc.
However, from the wireframe it's most likely that the drop down affects the main Predictions component.
In this case, where the selected line affects another sibling component, where do you store that state?
The lowest place in the element tree with these two components in common is actually still at the top level of this page. (Which is fine, and mostly unavoidable)
In this case we have to store the actual state in the top level.
The technique for doing this is called "lifted" functions.
Lifted Functions
If we want state to be available for 2 sibling components, we have to store it in the closest parent.
In order to set state on a parent component we must call a method on the parent component.
When the state is set on the parent, it will pass back down the data set in the method.
class App extends React.Component{

    constructor(){
        super();
        this.state = {
            station : "banana"
        };

        this.setCurrentStation = this.setCurrentStation.bind( this );
    }

  setCurrentStation(station){
    this.setState({station})
  }

  render(){
    return (
      <div>
        <Line setCurrentStation={this.setCurrentStation} station={this.state.station}/>
        <Trains station={this.state.station}/>
      </div>
    );
  }
}

class Line extends React.Component{
    constructor(){
        super();
        this.doStuff = this.doStuff.bind( this );
    }


  doStuff(){
    this.props.setCurrentStation("paddington")
  }

  render(){
    return (
      <div>
        <h1>{this.props.station}</h1>
        <button onClick={this.doStuff}/>
      </div>
    );
  }
}

class Trains extends React.Component{

  render(){
    return (
      <div>
        <h1>{this.props.station}</h1>
      </div>
    );
  }
}
Exercise
Implement a currency exchange form in react.
For a number of Singapore dollars it shows the amount of other denominations of another currency.
This form exists in a Form component.
Implement a sibling component that displays the number of yen you would get for the number entered in the Form component.
This sample shows the hierarchy of the components you should end up with: (this is not actual code)
  <Exchanger>
    <Form setSgd={this.setSgd}/>
    <Yen sgd={this.state.sgd} />
  </Exchanger>
Don't forget to use http-server
Don't forget to include the required libraries:
<script src="https://unpkg.com/react@16/umd/react.development.js"></script>
<script src="https://unpkg.com/react-dom@16/umd/react-dom.development.js"></script>
<script src="https://unpkg.com/babel-standalone@6.15.0/babel.min.js"></script>
further
Implement components for other currencies. (US Dollars, Ringet, Thai Baht, etc.)
further
Refactor the form so that you can select any currency in the form, instead of only SGD. Then the user enters the number of that currency in the form.
Change each currency component to take 2 properties instead:
<Yen currency={this.state.currency} amount={this.state.amount} />
further
So far you have a component for every single currency.
Change your app to have only one abstracted component for every currency.
Create a component for each currency based on a data object.
const rates = {
  "yen" : {
    "sgd" : 2.3,
    "usd" : 1.2
  },
  "gbp" : {
    "yen" : 4.2
  },

  ...

};